How to Install a Part Feeder
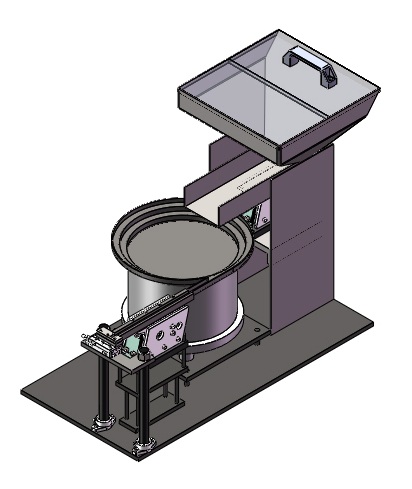
Parts feeders are automated systems that are designed to provide precise orientation to industrial components. Success of the system depends a great deal on its installation. This includes the bowl feeder, the vibrating drive unit, and the various tracks for part orientation. All base units of the system are adjusted in the factory and sent for final assembly. All components and fasteners are provided with the bowl feeder for easy installation.
Steps
1. Prepare the Base Casting : Take the rubber feet and attach them to the base casting. Ensure that the rubber is snug with the screws. However, the screws should not distort the rubber.
2. Install the Feeder Bowl to the Base Unit : The bowl is required to be installed on the top casting of the base unit. Depending on the base unit, there are three ways to mount the part feeder – top, center, or bottom mounting. Generally, center mounting is the most common method. Use between 3 and 8 fasteners provided for the bowl for installation.
3. Check the Feeder Stand : Check and ensure that the feeder stand is straight and rigid. It is extremely important that the vibrations do not get transmitted through the components. Otherwise, the part feeder and the electrical controls will not function properly.
4. Arrange the part Feeder Discharge: Align the mating tracks and chutes with the part feeder. Keep a small gap between the discharge and the mating tracks. This is to ensure that there is no restriction to the base unit and the movement of the bowl.
5. Connect the Wiring: The base unit either comes with or without power cords. For units without the cords, connect the part feeder to the base unit via a small hole in the base casting.
6. Check and Adjust the Coil: This is a rarity with part feeders. However, it is always better check this before you begin operations. Ensure that there is a gap between the armature and the coil. Always ensure that the two components never touch each other, especially when the base unit is operating at maximum feed rate.
7. Adjust the Spring Spacers, and Pads: Industrial springs are used to support the vibratory feeding process. Check that all of them are at an angle. Spring spacers are found between each spring pair. Check that they are present both above and beneath the springs. Align the spacers and the pads with each other. Place and tighten all the spring screws.
8. Start the Machine: When the power supply is turned on, the armature is attracted to the coil. This also causes the springs to flex. The top springs begin to rotate as they move downwards. The parts are oriented as they go through controlled obstacles and up the tracks. Parts placed inside the bowl will rotate around the inside floor of the bowl, go onto the track and discharge from the bowl.
Would you please review our company web for more information?
http://www.hldmachine.com
<< Previous[
Show Preview:Suzhou Huilide at PROPAK CHINA 2018]
Next >>[
10 THINGS YOU NEED TO DO AFTER EXPO]